
Libraries Directory Home • Online Guide • A to Z
|
The Libraries Directory 50th Edition Libraries Directory Home • Online Guide • A to Z |
Selecting Addresses • Creating • Opening • Settings • Editing • Output
The Marketing Version of the Libraries Directory application allows you to create, save, edit and customise mailing lists, and to output them as address labels or mail merges (both printed and email). To create a new mailing list, select Create Mailing List from the Mailing Lists menu or the Short Cut menu. To open an existing mailing list, select Open Mailing List from the Mailing List menu (please note that this menu item is disabled if you have not yet created any mailing lists).
To create a new mailing list, you first need to determine the source for the addresses you wish to include. The simplest way is to navigate to one of the following types of page, and use the entry or entries listed on the page as the basis for your mailing list:
 |
Any alphabetical index page | |
|---|---|---|
|
For example, if you want to create a mailing list for Irish Special and Academic Libraries, go to the Special and Academic Libraries Index and click on any letter listed under Ireland, and then select Create Mailing List from the menu. This will create a mailing list consisting of all entries in the index (not just those on the selected page). |
||
| |
Any search results page | |
|
For example, if you want to create a mailing list for all nursing libraries, then perform a search for Special and Academic Libraries where Subjects is equal to "nursing", navigate to any of the search results pages, and then select Create Mailing List from the menu. This will create a mailing list consisting of all entries found by the search (not just those on the selected page). |
||
| |
Any entry page | |
| For example, if you want to create a mailing list based on a single entry, then navigate to the entry's page, and then select Create Mailing List from the menu. This is useful for adding individual entries to an existing mailing list. |
Alternatively, you can run an advanced search as part of the mailing list creation process. In this case it does not matter what the current page is.
When you click on the Create Mailing List menu item, the Create Mailing List dialog opens:
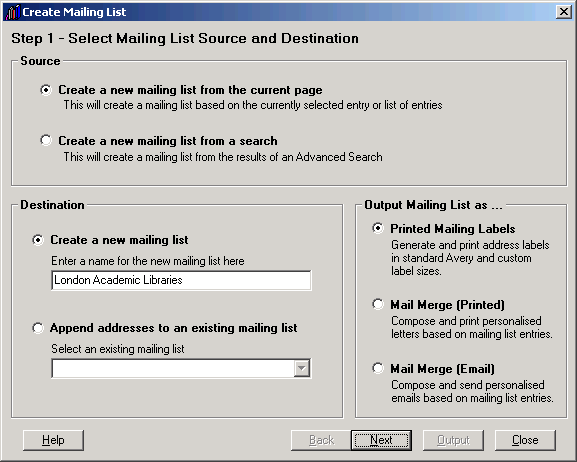
The first step in creating your mailing list involves setting three options:
| 1. |
The source of the addresses to be included (see above). |
|
|---|---|---|
| 2. |
The destination for the selected addresses. This can be a new mailing list, in which case you will need to enter a name for the list. Alternatively, you can append the addresses to an existing mailing list. The latter is useful for building up larger mailing lists from several different searches, or for adding individual entries to a list. |
|
| 3. | How the mailing list is to be used. You can output the list in the form of mailing labels, a printed mail merge or an email mail merge. If you select mailing labels or a printed mail merge as your output option, then the application will automatically filter the selected addresses so that only those with a full postal address are included in the final output. If you select an email mail merge as your output option, then the final output will only include addresses with one or more valid email addresses. |
Once you have set these options, click on the Next button to proceed to the next step.
To open a previously saved mailing list, select Open Mailing List from the Mailing Lists menu. This opens the Open Mailing List dialog, which is identical to the Create Mailing List except for the initial options, which provide a number of tools for managing your existing mailing lists:
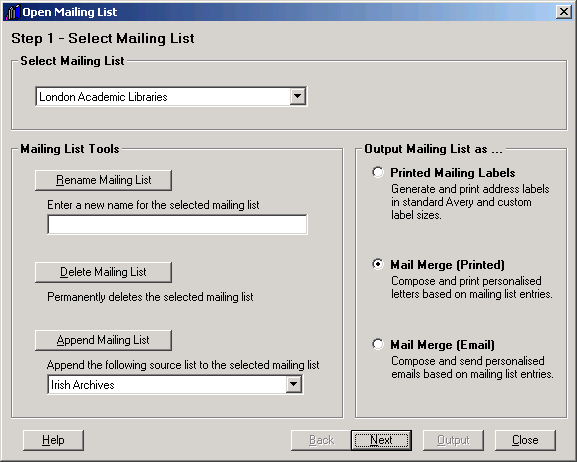
You can rename or delete any of your existing mailing lists, as well as append one mailing list to another (although you cannot append a mailing list to itself). You can also set the output option for your mailing list as before.
Click on the Next button to proceed to the next step.
Whether you are creating a new mailing list or re-using an existing one, the next step is to specify the default settings for the current mailing:
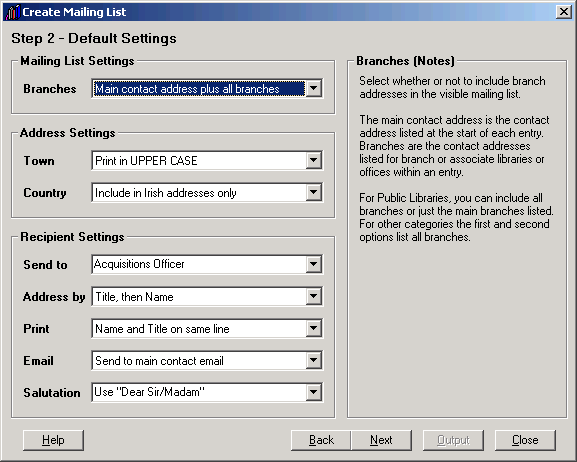
| 1. |
Choose whether or not to include branch addresses in the mailing. When a mailing list is compiled, it automatically includes both the main contact address for each entry and the addresses for any branches, departments or associate libraries/offices listed within the entry. Use this setting to include branches, or to exclude them and limit the mailing to main contact addresses. This setting applies to all output options, print or email. |
|
|---|---|---|
| 2. |
Choose whether the name of the town is to be printed in uppercase or title case. This setting applies to address labels and printed mail merges. |
|
| 3. |
Choose whether the country is to be included as part of the printed address. This setting applies to address labels and printed mail merges. |
|
| 4. |
Choose the recipient of your mailing. This can be the chief officer listed in the entry, or the officer in charge of stock acquisitions, inter-library loans, equipment purchases or (in the case of public libraries only) the officer in charge of activities and entertainments. You can also type in an alternative recipient (e.g., "The Audiovisual Librarian") if none of the listed officers is appropriate. This setting applies to all output options, print or email, and can also be customised for individual addresses. |
|
| 5. |
Choose how the recipient will be addressed or specified on the address label or in the "Recipient" mail merge field. You can address them by title only, name only, or a combination of both. This setting applies to all output options, print or email, and can also be customised for individual addresses. |
|
| 6. |
Choose whether the name and title of the recipient are to be printed on the same or different lines of the address. This setting applies primarily to address labels, but also to addresses displayed in printed mail merges. If you have chosen to address the recipient by name or title only, this setting is ignored. |
|
| 7. |
Choose the default email address for your mailing. You can either send emails to the main contact email for the library or institution, or to the personal address of the selected recipient. If the selected default is not available, then the application will automatically determine the most appropriate email for the recipient (institutional or personal). This setting applies to email mail merges only, and can also be customised for individual addresses. |
|
| 8. | Choose the default salutation to be used in mail merge documents if no name is specified for the selected recipient. Please note that this applies only to addresses where no recipient name is specified; otherwise the recipient's name will be used (e.g., "Dear Ms Smith"). You can also type in an alternative default salutation of your own (e.g., "Dear Customer" or "Dear Colleague"). This setting applies to mail merges, both print and email, and can also be customised for individual addresses. |
These settings are saved with the mailing list, but can be altered at any time. For example, if you are sending a mailing which requires both address labels and a mail merge, you may not wish to use the same settings for each, in which case you can set them differently on each occasion.
To create your mailing list and/or to apply these settings and open the mailing list for editing, click on the Next button. If you have chosen to compile a new mailing list based on an advanced search, then at this point the Advanced Search dialog will open. Create and run your search. The addresses of the entries found will then be used as the basis for your new mailing list.
N.B. If you are creating a large mailing list with many entries, it may take up to a minute for the list to be compiled, as the application automatically checks for and eliminates duplicate addresses.

Before outputting your mailing list, you can preview and edit the addresses individually:

The mailing list is displayed as a list of institution names. Click on the name to preview the full address, the salutation and email address (how they will appear is based on the settings chosen in the previous step). In order to distinguish them, branch addresses are marked with a B in the preview.
To include or exclude an address from the final mailing, use the check boxes beside each entry. To delete an address permanently from the mailing list, select the address and press the Delete key on your keyboard. The total number of addresses currently selected is displayed in the bottom right-hand corner of the dialog, along with a sub-total of addresses with a valid email.
Three additional facilities are included for managing and customising your mailing list further:
| 1. |
In order to find a particular address or addresses, click on the Find Address button to open the Find Address dialog. |
|
|---|---|---|
| 2. |
In order to select or deselect addresses in batches, or to re-sort the list, click on the Select and Sort button to open the Select and Sort Addresses dialog. |
|
| 3. | In order to customise the recipient settings for an individual address, select the address and click on the Customise Address button to open the Customise Address dialog. |
When you are ready to output your mailing list, click on the Output button.
Depending on the output option selected previously, clicking the Output button will open one of three windows where you can edit, preview and print/send your mailing in the form of address labels or as a mail merge:
| |
Mailing Labels | |
|---|---|---|
|
Opens the Mailing Label Preview window, where you can set the address label size and the font size and alignment of the printed addresses. Address labels can be sent to the printer directly, or can be exported as PDF files for printing later (requires the Acrobat Distiller printer driver to be installed). |
||
| |
Mail Merge (Printed) | |
|
Opens the Mail Merge window, where you can compose a mail merge document from scratch or import and edit a Rich Text document created in another application. Mail merges can be sent to the printer directly, or can be exported as PDF files for printing later (requires the Acrobat Distiller printer driver to be installed). |
||
| |
Mail Merge (Email) | |
| Opens the Email Mail Merge window, where you can compose an email from scratch or import and edit a plain text or HTML document created in another application. Emails can be sent using the application's internal email program (which allows the greatest flexibility in terms of formatting) or via your default email program. |
See Also
About the CD-ROM
James Clarke and Co Ltd
PO Box 60, Cambridge, CB1 2NT, England
Tel: +44 (0) 1223 350865 Fax: +44 (0) 1223 366951
email: publishing@jamesclarke.co.uk