
Libraries Directory Home • Online Guide • A to Z
 |
The Libraries Directory 50th Edition Libraries Directory Home • Online Guide • A to Z |
Creating • Editing • Adding Fields • Testing • Compiling • Previewing • Sending
When you select the "Mail Merge (Email)" output option in the Create/Open Mailing List dialog and then click on the Output button, the application opens the Email Mail Merge window. This is where you can create, preview and send email messages from your mailing list.
For a detailed list of the tools and features available, see The Email Mail Merge Window.
N.B. Before you can send an email mail merge, you will need to enter your email account settings in the Email Account Settings dialog.
The Email Mail Merge window opens in Compose and Edit mode, which provides an email composing package, including a basic HTML editor. You can use this to create a template for your mail merge from scratch, or you can import and edit an existing file for your message text.
| 1. |
To create a new message template, click on New Message in the File menu or click on the New button in the tool bar just above the message textbox. This will replace the existing contents of the message fields with blank or default values. If you are composing in HTML format, then opening and closing <html> and <body> tags will be inserted into the Message textbox automatically, along with default settings for the basefont face, size and colour. |
|
|---|---|---|
| 2. |
To import an existing file, click on Import Message from File in the File menu, or click on the Open button in the tool bar. This can be a message template that you created and saved using the Libraries Directory application, or it can be a file created and saved using another program. If you are using the application's internal email program, then you can import either Text files (*.txt) or HTML files (*.htm or *.html). If you are using your default email program, you can import Text files only. You will then be able to add mail merge fields and run the mail merge. |
|
| 3. | To save your message template, click on Save Message to File in the File menu, or click on the Save button in the tool bar. If you are using the application's internal email program, then you can save the message as a Text file (*.txt) or as an HTML file (*.htm or *.html). If you are using your default email program, you can save the message as a Text file only. |
In composing your message template, you can set the following elements:

| 1. |
Subject - Required; this is the subject line that will appear in the emails that are sent. Can include mail merge fields (e.g., "For the Attention of [Title]"). |
|
|---|---|---|
| 2. |
Message Priority - Optional; use the drop-down list to set the message priority for all your emails to Low, Normal or High (Normal is the default value). This option is only available when using the application's internal email program. |
|
| 3. |
Request Read Receipt - Optional; tick the check-box to prompt the recipient to send an automated email receipt when they open the email (this will be applied to all messages in the list). This option is only available when using the application's internal email program. |
|
| 4. |
Attachments - Optional; to add attachments to your mailing, click on the Attachments button or the Add Attachment item in the Compose menu. Use the Select Attachment dialog to choose the file you want to attach to your messages. The full path of the attachment will then be entered in the Attachments textbox. You can include multiple attachments, each of which should be listed on a separate line. To remove an attachment, select the text of the path and delete it. |
|
| 5. | Message - Required; this is the body of your message. See below for editing options. |
N.B. All of the above elements can also be customised for individual messages in Preview and Send mode. Please also note that you cannot perform a mail merge if the Subject and Message textboxes are blank.
If you have chosen to send your emails via your default email program, you will only be able to compose and send emails in plain text format. If you are using the application's internal program, then you can compose and send emails in either plain text or HTML format. A variety of tools are provided for editing the message template:
| 1. |
Use the tool bar just above the Message textbox to insert mail merge fields using the Insert Field button (opens the Insert Field menu as a drop-down list). If you are composing in HTML format, then an additional selection of text-formatting tools is also available: Bold, Italics, Underline, Paragraph (opens a drop-down list of paragraph tag options), Line Break, Font (opens the Select HTML Font dialog), and Insert Tag (opens the Insert HTML Tag menu as a drop-down list). |
|
|---|---|---|
| 2. |
Use the Compose menu to add attachments (click on Add Attachment to open the Select Attachment dialog) and to insert mail merge fields (click on Insert Field to open the Insert Field menu). If you are composing in HTML format, then you can also use the Compose menu to insert HTML tags (click on Insert HTML Tag to open the Insert HTML Tag menu) and to add font formatting (click on Select HTML Font to open the Select HTML Font dialog). |
|
| 3. |
Use the Edit menu for standard edit functions: Undo (last action only), Cut, Copy, Paste, Delete and Select All. The menu is available as a pop-up menu when you click the right-hand mouse button within the Subject, Attachment or Message textboxes. |
|
| 4. | Use the View HTML/Edit HTML button to switch the message textbox between edit mode (showing the HTML code for your message) and view mode (showing your formatted message as it will be displayed). The View HTML/Edit HTML menu item in the View menu performs the same function. Available only when composing in HMTL format. |
N.B. If you wish to use more advanced HTML formatting options, such as styles, you may prefer to create the message text in a more powerful HTML editor, save it, and then import the file into the message window. You can then insert the necessary mail merge fields into the pre-edited and formatted text.
To turn your message text into a mail merge template, you will need to add one or more mail merge fields. These act as placeholders for personalised recipient and other details from your mailing list. Mail merge fields can be inserted into the Subject and Message textboxes only. The fields available are:
Name of Institution - the full name of the library or institution
Recipient (Full) - the name and/or title of the recipient, as determined by your mailing list settings
Recipient (Title only) - the title of the recipient
Recipient (Name only) - the name of the recipient (if available)
Salutation - i.e., "Dear ..."
Town - the town in which the library or institution is located
County - the county in which the library or institution is located
Country - the country in which the library or institution is located
To insert a field into either the Subject or Message textboxes, place the cursor where you wish the field to go, and then select one of the above items from the Insert Field menu. The menu can also be opened as a drop-down list by clicking on the Insert Field button on the tool bar. The field is then inserted into the textbox.
Mail merge fields are distinguished from the rest of the text by delimiters before and after the field name. The default delimiters are square brackets (e.g., [Title]), but you can use the Email Preferences dialog to choose curly brackets (e.g., {Title}) or text (e.g., INSERT_Title_HERE) instead. The application requires these delimiters in order to identify the field and to replace it with the appropriate value, so it is important not to alter the field names or the delimiting characters.
To remove a mail merge field, simply select the text of the field, including the delimiters, and delete it.
In order to check that the message can be sent and received properly, you can choose to send it as a test email. This will be sent not to the recipient, but to an email address chosen by you. Click on the Send Test Email button at the bottom of the window or select the Send a Test Email item in the Compose menu. This will open a Send Test Email dialog, prompting you to enter the email to which the message should be sent. The default address will be the sender's address entered in the Email Account Settings dialog. You can either accept this or enter a different address.
In Preview and Send mode, you can also send the currently selected message as a test email. Use the Send a Test Email item in the Mailing List menu.
When you have finished composing or editing the message template, and you have entered any mail merge fields required, click on the Perform Merge button at the bottom of the window, or click on the Perform Merge item in the Compose menu. This will create individual, personalised messages for each address in your mailing list. These messages are saved directly to the mailing list table itself, allowing them to be customised individually, or to be sent at a later date.
Before compiling the mail merge, the application performs a number of checks and displays the results in a Mail Merge Fields Checked dialog:
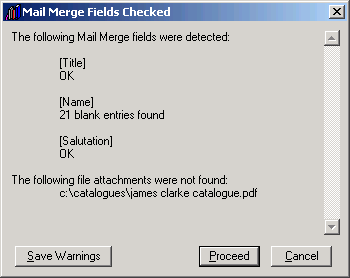
The checks performed are as follows:
| 1. |
Mail merge fields in the message template - If any of the fields in the mailing list have blank values, the application will warn you and indicate how many records with blank values were found. |
|
|---|---|---|
| 2. |
Invalid mail merge fields - Any text enclosed within the selected mail merge field delimiters and which does not match a recognised field name will be flagged as a possible invalid field. |
|
| 3. |
Invalid field formatting - e.g., if an opening delimiter is found without a corresponding closing one, or a closing delimiter without a corresponding opening one. The application will warn you in which message field (Subject or Message) the error has been detected. |
|
| 4. |
Missing attachment files - The application checks the paths of each of the files listed in the Attachments textbox, and warns you which (if any) of the files were not found. |
|
| 5. | Missing linked files - The application checks any file paths that have been inserted into the message text (e.g., those referenced with the <img> tag), and warns you which (if any) of the files were not found. |
If your message template has triggered one or more errors, you can cancel the mail merge so that you can fix any problems. To save the warning messages in order to refer back to them, click on the Save Warnings button.
Previewing an Email Mail Merge

To preview an email mail merge, click on the Preview button at the bottom of the window or select the Preview and Send item in the View menu. When you compile a successful mail merge, the window will switch to Preview and Send mode automatically.
In Preview and Send mode, each message is shown with the mail merge fields replaced by the appropriate address or recipient details. You can preview (and in some cases edit) the following elements of each message:
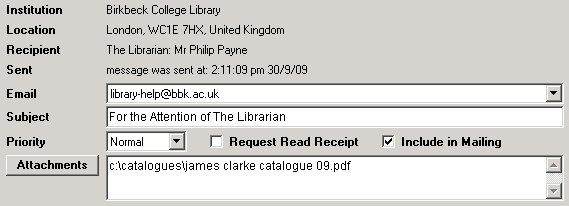
| 1. |
Institution - Not editable; this is name of the institution being contacted. Displayed for identification/reference purposes only. |
|
|---|---|---|
| 2. |
Location - Not editable; lists the town, county, postcode and country of the institution being contacted. Displayed for identification/reference purposes only. |
|
| 3. |
Recipient - Not editable; this is the full title and name of the person to whom the message is to be sent. Displayed for identification/reference purposes only. |
|
| 4. |
Sent - Not editable; indicates whether or not the current message has been successfully sent. If it has already been sent, then the date and time on which it was sent is shown. |
|
| 5. |
Email - Editable for some entries only; this is the email address for the selected recipient. A few entries have more than one email listed for their main contact address, in which case you can use the drop-down list to select an alternative email. |
|
| 6. |
Subject - Editable; this is the subject line that will appear in the email. |
|
| 7. |
Message Priority - Editable; use the drop-down list to set the message priority for the current message to Low, Normal or High. Only available when using the application's internal email program. |
|
| 8. |
Request Read Receipt - Editable; tick the check-box to prompt the recipient to send an automated email receipt when they open the email. Only available when using the application's internal email program. |
|
| 9. |
Include in Mailing - Editable; use this check-box to include or exclude the current message from the final mailing. Use the Select All Messages and Deselect All Sent Messages options in the Mailing List menu for more general selection options. |
|
| 10. |
Attachments - Editable; to add a new attachment to the list, click on the Attachments button. |
|
| 11. | Message - Editable; this is the body of the current message. |
When you edit a message, use the Save button at the bottom of the window to save any changes.
Initially, the first address in your mailing list is the one displayed. To preview the other addresses, use the navigation buttons at the bottom of the window to move from record to record, or use the options available in the Move menu. The position of the current record out of the total number of records in the mailing list is displayed alongside the navigation buttons. To find a particular message or messages, select Find Message from the Move menu or click on the Find button at the bottom of the window. This will open the Find Address dialog.
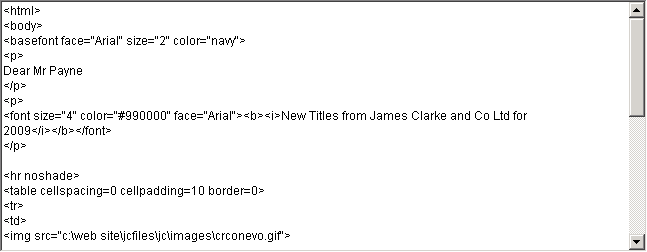
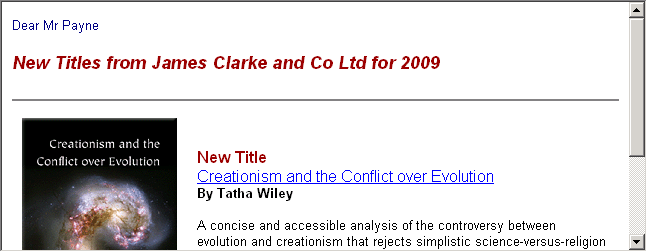
If you are sending your mailing in HTML format, you can use the View HTML/Edit HTML button to switch the message textbox between edit mode (showing the HTML code) and view mode (showing the message as it will be displayed). The View HTML/Edit HTML menu item in the View menu performs the same function:
| Edit mode |
|
| View mode |
|
Additional tools and options include:
| 1. |
Use the Include in Mailing check-box to include or exclude individual messages from the current mailing. For more general selection options, click on Select All Messages in the Mailing List menu to include all messages in your mailing, or click on Deselect All Sent Messages to exclude all messages that have already been sent. The second option is useful if you have been forced to abort a mailing halfway through, and wish to retry sending the unsent messages. |
|
|---|---|---|
| 2. |
To send the current message as a test email, click on the Send a Test Email item in the Mailing List menu. |
|
| 3. | To clear all the messages in the mailing list, click on the Clear Messages item in the Mailing List menu. For each entry in the mailing list, this will delete the subject, attachments and message text, reset Message Priority to Normal, reset Request Read Receipt to off, and set the Include property to positive. |
To return to Compose and Edit mode, either select Compose and Edit from the View menu, or click on the Compose button at the bottom of the window.
To send the currently selected message only, click on the Send Message button at the bottom of the window, or select Send Current Message from the Mailing List menu.
To send all messages in the mailing list (except for those that you have specifically excluded), click on the Send All button at the bottom of the window, or select Send All Messages from the Mailing List menu.
Before sending the mailing, the application will check your email account settings and warn you if any of the required settings are missing or incorrectly entered. The application will then run a final series of checks on each message selected for sending, and will display a Messages Checked dialog:
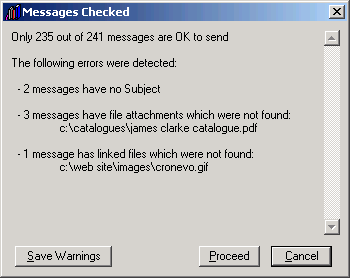
This will indicate if the email or emails are ready to be sent, and will list any errors or problems encountered. Possible errors are:
| 1. |
No messages selected - You must have at least one message selected for sending before you can proceed. |
|
|---|---|---|
| 2. |
One or more messages already sent - Occurs if the current mail merge has already been sent, or if a previous mailing was aborted part of the way through. |
|
| 3. |
Messages with no subject - Indicates how many messages were found where the subject line was blank. |
|
| 4. |
Messages with no message text - Indicates how many messages were found where the message content was blank. |
|
| 5. |
Messages with missing attachments - Indicates how many messages were found with missing or invalid attachments, and lists the invalid file paths. |
|
| 6. | Messages with missing linked files - Indicates how many messages were found with invalid file paths in the body of the message (e.g., those referenced with the <img> tag), and lists the invalid paths. |
If your mailing has triggered one or more errors, then you can cancel it so that you can fix any problems. To save the warning messages in order to refer back to them, click on the Save Warnings button. Alternatively, as long as at least one message is ready to send, you can click on the Proceed button to continue with the mailing.
Sending with the Application's Internal Email Program
The application's internal email program will send the emails directly to your email server, bypassing any other email programs on your machine. You will need to have an active network connection to be able send to a local email server, and an active internet connection to send to a remote email server.
Sending with Your Computer's Default Email Program
This will send the emails to the Outbox of your computer's email program. Unless your email program is configured to send new messages automatically, you will still need to send them from your email program. Please note that in order to set up your email program to receive the mailing, you will need to do the following:
| 1. |
Make sure your email program is open and running. |
|
|---|---|---|
| 2. |
If you have more than one email account set up, then you should set the default account to correspond to the sender's address that you wish to use for the mailing. |
|
| 3. |
If your email program's security options are set up to warn you if another application is trying to use it to send email, then you should temporarily disable this setting. Otherwise, a warning message will appear for each email that the Libraries Directory application tries to send to your program. You can re-enable the setting after the mailing has been sent. |
|
| 4. | If you wish to do a final review of the emails in your Outbox before sending, then you should also switch off any "Send Automatically" or "Send Messages Immediately" option. |
N.B. For large mailings, or mailings sent with large attachments, your mailing may take several minutes or longer to send.
See Also

About the CD-ROM
Creating and Managing Mailing Lists
The Email Mail Merge Window
Setting Email Preferences
James Clarke and Co Ltd
PO Box 60, Cambridge, CB1 2NT, England
Tel: +44 (0) 1223 350865 Fax: +44 (0) 1223 366951
email: publishing@jamesclarke.co.uk