
Libraries Directory Home • Online Guide • A to Z
|
The Libraries Directory 50th Edition Libraries Directory Home • Online Guide • A to Z |
File Menu
• Edit Menu
• Compose Menu
• Insert Field Menu
• Insert HTML Tag Menu
• Mailing List Menu
View Menu
• Move Menu
• Help Menu
• Tool Bar
• Button Bar
• Font Dialog
The Email Mail Merge window is opened when you select the "Mail Merge (Email)" output option in the Create/Open Mailing List dialog and then click on the Output button. It includes the following facilities and tools for creating, previewing and sending mail merges by email.
N.B. The Email Mail Merge window has two viewing modes between which you can switch:
Compose and Edit
Many of these facilities are only available in one of these modes, and will be invisible or disabled in the other.
See Performing an Email Mail Merge for additional information on using these facilities.
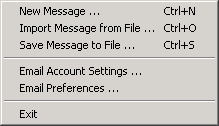
Click on New Message to create a new message template. Available in Compose and Edit mode only.
Click on Import Message from File to open an existing Text or HTML file to use as a message template. Available in Compose and Edit mode only.
Click on Save Message to File to save the current message template as a Text or HTML file. Available in Compose and Edit mode only.
Click on Email Account Settings to open the Email Account Settings dialog. Here you can specify the account settings required for you to send emails from the application, including your email address, your user name and password, and the SMTP address of your email server.
Click on Email Preferences to open the Email Preferences dialog. Here you can set your preferences for composing and sending your messages, including which email program to use and whether to send emails as plain text or HTML.
Click on Exit to close the Email Mail Merge window.
Available as a pop-up menu when you click the right-hand mouse button in the Subject, Attachments or Message textboxes.
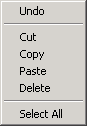
Click on Undo to undo the last change to the current textbox.
Click on Cut to remove the currently selected text and copy it to the clipboard.
Click on Copy to copy the currently selected text without deleting it.
Click on Paste to paste the contents of the clipboard into the current textbox.
Click on Delete to delete the currently selected text.
Click on Select all to select all of the text in the current textbox.
Only available in Compose and Edit mode:

Click on Add Attachment to add an attachment to your message.
Click on Insert Field to open the Insert Field menu as a sub-menu.
Click on Insert HTML Tag to open the Insert HTML Tag menu as a sub-menu. Only available if composing in HTML format.
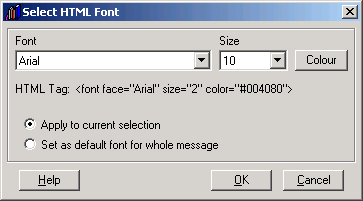
Click on Select HMTL Font to set the font, font size and colour of the selected text, or for the whole message. Opens the Select HTML Font dialog. Only available if composing in HTML format.
Click on Send a Test Email to send a test or preview copy of the message either to your own email address or to some other user-specified email address.
Click on Perform Merge to perform your mail merge and switch to Preview and Send mode to view the individual messages.
Opens as a sub-menu of the Compose menu, or when you click the Insert Field button in the tool bar. Only available in Compose and Edit mode:
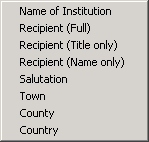
Click on Institution to insert the "Institution" mail merge field into the Subject or Message textboxes. This comprises the full name of the institution.
Click on Recipient (Full) to insert the "Recipient" mail merge field into the Subject or Message textboxes. This comprises the title and/or name of the recipient, depending on the settings specified in the Create/Open Mailing List dialog.
Click on Recipient (Title Only) to insert the "Title" mail merge field into the Subject or Message textboxes. This comprises the job title of the recipient.
Click on Recipient (Name Only) to insert the "Name" mail merge field into the Subject or Message textboxes. This comprises the name of the recipient (if available).
Click on Salutation to insert the "Salutation" mail merge field into the Subject or Message textboxes. This comprises the appropriate salutation for the recipient (e.g., "Dear Ms Smith" or "Dear Dr Jones"). If no name is listed for the recipient, the default salutation specified in the Create/Open Mailing List dialog is used instead (e.g., "Dear Sir/Madam").
Click on Town to insert the "Town" mail merge field into the Subject or Message textboxes. This comprises the town in which the library or institution is located.
Click on County to insert the "County" mail merge field into the Subject or Message textboxes. This comprises the county in which the library or institution is located.
Click on Country to insert the "Country" mail merge field into the Subject or Message textboxes. This comprises the country in which the library or institution is located.
N.B. Please note that the "Name" and "County" fields may be blank for some addresses, as may the "Town" field for a handful of addresses which include email contact information only. When you perform a mail merge, the application will warn you if any blank values have been found for any of the mail merge fields used. If you would prefer to avoid including blank values, re-edit the message text to remove them and then repeat the mail merge.
Opens as a sub-menu of the Compose menu, or when you click the Insert Tag button in the tool bar. Only available in Compose and Edit mode, and if you are composing in HTML format:
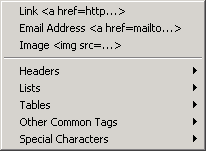
Click on Link to insert a hyperlink tag (<a href=...></a>) into the message text. A dialog will prompt you to enter the URL for the link.
Click on Email Address to insert an email address into the message text as a hyperlink tag (<a href=mailto:...></a>). A dialog will prompt you to enter the address.
Click on Image to insert an image tag (<img src=...>) into the message text. A dialog will prompt you for the path to the image file.
Click on Headers to open a sub-menu from which you can insert a selection of header tags (e.g., <h1></h1>) into the message text.
Click on Lists to open a sub-menu from which you can insert a selection of HTML list tags into the message text.
Click on Tables to open a sub-menu from which you can insert a selection of HTML table tags into the message text.
Click on Other Common Tags to open a sub-menu from which you can insert a selection of other commonly-used HTML formatting tags.
Click on Special Characters to open a sub-menu from which you can insert the HTML code for a selection of commonly-used special characters.
Only available in Preview and Send mode:

Click on Clear Messages to delete the subject, attachments and message text for all messages in the mailing list. This will also reset the message priority and request read-receipt properties for each message (to Normal and Off respectively).
Click on Select All Messages to select all messages for inclusion in the current mailing.
Click on Deselect All Sent Messages to exclude from the current mailing all messages that have already been marked as sent.
Click on Send a Test Email to send a test or preview copy of the current message either to your own email address or to some other user-specified email address.
Click on Send Current Message to send the currently selected message.
Click on Send All Messages to send all of the messages in the mailing.
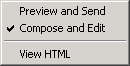
Click on Preview and Send to switch the Email Mail Merge window to Preview and Send mode.
Click on Compose and Edit to switch the Email Mail Merge window to Compose and Edit mode.
Click on View HTML/Edit HTML to switch the message textbox between editing mode (displays HTML code) and viewing mode (displays the formatted message as it will appear to the recipient). Only available if composing in HTML format.
Only available in Preview and Send mode:
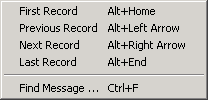
Click on First Record to move to the first record in the mailing list.
Click on Previous Record to move to the previous record in the mailing list.
Click on Next Record to move to the next record in the mailing list.
Click on Last Record to move to the last record in the mailing list.
Click on Find Message to find a particular message or messages. Opens the Find Address dialog.
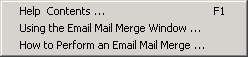
Click on Help Contents to open the application's Help file at the Contents page.
Click on Using the Email Mail Merge Window to open the Help topic for the Email Mail Merge window.
Click on How to Perform an Email Mail Merge to open the Help topic for performing email mail merges.
Only available in Compose and Edit mode:

Use the New, Open and Save buttons to create a new message template, open an existing file, and to save your current message template.
Click on the Insert Field button to open the Insert Field menu as a drop-down list.
Use the bold, italics and underline buttons to format the currently selected message text. Only available if composing in HTML format.
Use the paragraph and carriage return buttons to add paragraph and line breaks to the message text. The paragraph button opens a drop-down menu allowing you to choose between a simple paragraph break (<p>) and paragraph breaks with opening and closing tags (<p>...</p>), along with paragraph alignment options. Only available if composing in HTML format.
Use the Font button to open the Select HTML Font dialog and set the font, font size and font colour for the selected text or for the whole message. Only available if composing in HTML format.
Use the Insert Tag button to open the Insert HTML Tag menu as a drop-down list. Only available if composing in HTML format.
In Compose and Edit mode, the button bar consists of:

Click on the Preview button to switch the Email Mail Merge window to Preview and Send mode.
Click on the View HTML/Edit HTML button to switch the message textbox between editing mode (displays HTML code) and viewing mode (displays the formatted message as it will appear to the recipient). Only available if composing in HTML format.
Click on the Send Test Email button to send a test or preview copy of the message either to your own email address or to some other user-specified email address.
Click on the Perform Merge button to perform your mail merge and switch to Preview and Send mode to view the individual messages.
In Preview and Send mode, the bar consists of:

Click on the navigation buttons to move from record to record. The current record and total number of addresses in the current mailing are also displayed here.
Click on the Compose button to switch the Email Mail Merge window to Compose and Edit mode.
Click on the Save button to save any changes to the current message.
Click on the Find button to find a particular message or messages. Opens the Find Address dialog.
Click on the View HTML/Edit HTML button to switch the message textbox between editing mode (displays HTML code) and viewing mode (displays the formatted message as it will appear to the recipient). Only available if sending in HTML format.
Click on the Send Email button to send the currently selected message.
Click on the Send All button to send all the messages in the mailing.
To open the dialog, click on Select HTML Font in the Compose Menu, or click on the Font button in the tool bar. Use the dialog to set the font, the font size and the font colour for the currently selected text in the message template, or to set the default font characteristics for the whole message. Only available if composing in HTML format.
See Also

About the CD-ROM
James Clarke and Co Ltd
PO Box 60, Cambridge, CB1 2NT, England
Tel: +44 (0) 1223 350865 Fax: +44 (0) 1223 366951
email: publishing@jamesclarke.co.uk