
Libraries Directory Home • Online Guide • A to Z
|
The Libraries Directory 50th Edition Libraries Directory Home • Online Guide • A to Z |
Finding Addresses • Selecting and Sorting Addresses • Customising Addresses
When previewing and editing mailing lists, there are a number of facilities available to help you manage and customise the addresses in the list.
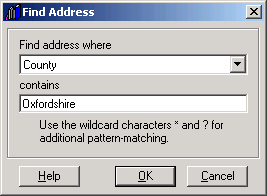
To find a particular address or addresses in your mailing list, use the Find Address dialog:
The dialog can be accessed from three possible locations:
| 1. |
Click the Find Address button when previewing the mailing list in the Create/Open Mailing List dialog. |
|
|---|---|---|
| 2. |
Click the Find button or the Find Record menu item when previewing a printed mail merge in the Mail Merge window. |
|
| 3. | Click the Find button or the Find Message menu item when previewing an email mail merge in the Email Mail Merge window. |
Select an address field from the drop-down list, and enter a search term into the text box. The application will look for fields that contain any instance of the search term, rather than looking for an exact match. You can use the wildcard characters * (asterisk) and ? (question mark) for additional pattern-matching within the search term. Leave the text box blank to search for blank values in a field. Please note that the search is not case-sensitive.
If a match is found for your search term, the mailing list or mail merge display will move to the address found. The Find Address dialog retains the last selected search criteria, so to find the next match for your search term, just re-open the dialog and click OK again.
Selecting and Sorting Addresses

Use the Select and Sort Addresses dialog to select or deselect groups of addresses that match a specific search criterion, and to re-sort the order in which they are listed. To access the dialog, click the Select and Sort button in the Create/Open Mailing List dialog.

| 1. |
Use the top-most drop-down list to determine which category of addresses you wish to select or deselect. You can choose to select or deselect:or choose one of the following:
|
|
|---|---|---|
| 2. |
If you simply wish to select/deselect addresses based on your initial category selection, then choose the default "(no additional criteria)" option from the second drop-down list. To select/deselect addresses based on whether or not a particular part of the address matches a particular text value, then choose an address field from the second drop-down list. Select whether you want to select/deselect addresses which match your search term or which do not match your search term, and then enter your search term in the text box provided. You can use the wildcard characters * (asterisk) and ? (question mark) in your search term to match partial values. Leave the text box empty to select/deselect addresses with blank values in the selected address field. Please note that the search comparison is not case-sensitive. |
|
| 3. |
Addresses can be deleted permanently from the mailing list by ticking the Delete rather than deselect check-box. This option is only available if you have specifically chosen a deselect option, and if the action will not result in the entire mailing list being deleted. |
|
| 4. | To re-sort the mailing list, choose the address field you want to sort on from the Sort Addresses drop-down list. Then choose the order you want to sort on, either Ascending (i.e., A to Z) or Descending (i.e., Z to A). If you just wish to re-sort the mailing list, but do not want to change the existing selection of addresses, then make sure to choose the "Retain existing selection" option from the initial select/deselect list. |
Using the Dialog
The Select and Sort Addresses dialog can be used to edit your mailing list quickly and effectively, especially when the list is too long for it to be practical to check each address individually. It can also allow you to perform separate customised mailings from the same list, rather than having to create a new list for each mailing.
Example #1
Suppose you have a mailing list of academic libraries, in which you wish to include branch libraries, but not any institutional archives that have also been listed as branches. To do this, deselect all branch addresses where the Institution Name matches the search term "*archive*" (you can also repeat this with other possible variations such as "*record office*" or "*records section*"). Note that you will need to include the * wildcard character to match partial field values.
Example #2
Suppose you have a mailing list where some addresses have emails but others do not, and you wish to divide your mailing into two - one mailing by email, and a separate postal mailing for addresses without email. Perform the email mailing, and then reopen the mailing list for the postal mailing, and use the "Deselect all addresses with email" option. This will ensure that your postal mailing will exclude any addresses previously included in your email mailing.
Example #3
Suppose you have a frequently used mailing list of libraries, but on this occasion you wish to do two separate mailings, one for libraries in London and one for libraries outside London. First deselect all addresses where Town equals the search term "London", and then proceed with the mailing to non-London libraries. Then open the mailing list again, and use the "Invert current selection" option, so that now only London addresses are selected. You can then proceed with the separate mailing to London libraries.
Use the Customise Addresses dialog to customise the recipient settings for an individual address. To access the dialog, select an address and click the Customise Address button in the Create/Open Mailing List dialog.
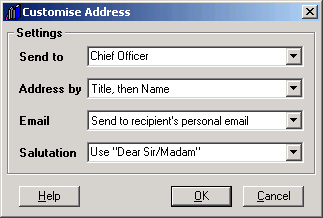
The following settings can be customised for the selected address:
| 1. |
The recipient of your mailing. This can be the chief officer listed in the entry, or the officer in charge of stock acquisitions, inter-library loans, equipment purchases or (in the case of public libraries only) the officer in charge of activities and entertainments. You can also type in an alternative recipient (e.g., "The Audiovisual Librarian") if none of the listed officers is appropriate. This setting applies to all output options, print or email. |
|
|---|---|---|
| 2. |
How the recipient will be addressed or specified on the address label or in the "Recipient" mail merge field. You can address them by title only, name only, or a combination of both. This setting applies to all output options, print or email. |
|
| 3. |
The default email address for your mailing. You can either send emails to the main contact email for the library or institution, or to the personal address of the selected recipient. If the selected default is not available, then the application will automatically determine the most appropriate email for the recipient (institutional or personal). This setting applies to email mail merges only. |
|
| 4. | The default salutation to be used in mail merge documents if no name is specified for the selected recipient. Please note that this applies only to addresses where no recipient name is specified; otherwise the recipient's name will be used (e.g., "Dear Ms Smith"). You can also type in an alternative default salutation of your own (e.g., "Dear Customer" or "Dear Colleague"). This setting applies to mail merges, both print and email. |
See Also
About the CD-ROM
James Clarke and Co Ltd
PO Box 60, Cambridge, CB1 2NT, England
Tel: +44 (0) 1223 350865 Fax: +44 (0) 1223 366951
email: publishing@jamesclarke.co.uk
 All addresses